Tutorial
We are going to show how to use InstrumentDB through a simple tutorial that will create and deploy the model of a ground-based experiment for the observation of the Cosmic Microwave Background (CMB). The exact nature of the experiment is not important for the example, but it helps in making things more concrete.
What we are going to do
Here is a briew overview of this tutorial:
We must decide what kind of information we want to store in the database (What information to store);
Then, we will organize the information in a so-called schema, which tells InstrumentDB how to structure the data we are going to upload to the database (Defining a schema);
Once we implement the schema, we will upload data files to the server (Upload data files);
Finally, we will show how to access this information through the web interface and using the RESTful web API from the Python REPL (Accessing the database).
What information to store
During the design phase of an instrument like the model described above, several designs are attempted, and their value is judged depending on the expected scientific outcome. Thus, the information to be stored in an instrument model must be sufficient to simulate the behaviour of the instrument to the point that this scientific outcome can be estimated realistically.
In a typical CMB experiment, the microwave radiation coming from the sky is collected by an optical system into feed horns, which convert free propagation of the photons into guided propagation. At the end of the acquisition chain, the radiation is measured by detectors and saved in files. We can thus list the items that should be stored in our instrument model:
Sky region that the instrument will observe;
Specification of the optical response for each feed;
Noise level of each acquisition chain;
Bandshape response of the detectors.
In the next section, we will show how to organize these items into a database structure that can be managed by InstrumentDB.
Defining a schema
Fundamental terminology
InstrumentDB organizes information according to the following concepts:
- Format specification
Every kind of information that will be stored in the database should be properly documented. To enforce this, InstrumentDB keeps a list of documents that describe the format used for files stored in the database. Several document types are recognized: PDF, Markdown, HTML, Word files, etc.
- Entity
An entity refers to some part of the instrument. In our example, an acquisition chain is an entity, as well as the telescope. Entities can be nested, so that the entity «acquisition chain» can contain the entities «filter» and «amplifier».
- Quantity
A measurable feature of an entity. If the entity is an «amplifier», the quantity might be the amplifier’s calibration curve, or its datasheet. Strictly speaking, a «quantity» is not really a concrete number, because these are provided by data files (see below). However, InstrumentDB permits users to query quantities for concrete numbers, as it has a way to associate quantities to data files. Several quantities can be associated to an entity.
- Data file
This is where the real data are stored. A data file can be anything the user wants: an Excel spreadsheet, a JSON metadata, a full thermal model, etc. Data files must be associated to quantities. InstrumentDB keep a version history of data files, so that they can be updated whenever required. It is possible to specify dependencies between data files: for instance, the data file of the calibration curve of an amplifier might state a dependency on a data file containing the data sheet of the amplifier itself.
- Release
Once in a while, the design of an instrument needs to be updated. This can happen after an extensive test campaign of the real hardware, or when some changes in the design of the instrument must be adopted to ensure the fullfillment of the scientific goals, or to face budget limits. InstrumentDB provides the ability to group data files into «releases», which are tagged with an unique name and whose data files can be accessed through that name.
Entities, quantities, and data files are represented in the following diagram:
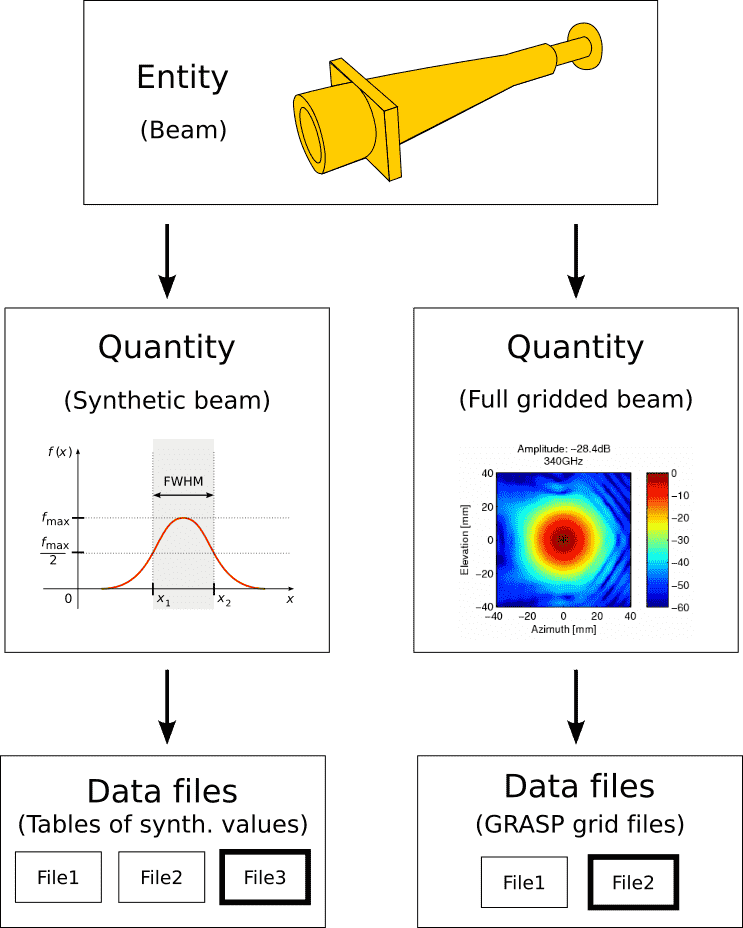
Relationship between entities, quantities, and data files. The most recent data file is shown with a thick border.
Specification documents
We must first define the list of specification document for each quantity. The structure above assumes the following data formats:
Optical models; these might be proprietary files produced by some simulation software like GRASP, for instance. The specification document might well be the user’s manual of the software, or a short technical note detailing the assumptions that must be used in the creation of the optical model (e.g., handedness of the coordinate system, measure units, etc.).
Thermal models; again, these are usually proprietary files.
Calibration curves for the amplifiers; we can assume that they are saved in CSV files. The format specification might be a text file specifying what’s in each column, and what are the assumptions used in the calculation of these curves.
Data sheets for the amplifiers: we can assume this is the PDF file provided by the vendor.
Bandshape response: usually a bandshape is encoded as a two-column table that specifies the frequency and the response at that frequency.
Let’s assume that we have already collected all the documents listed above. Open a text editor and write the following YAML text:
format_specifications:
  - document_ref: "DOC-0001-OPTICAL-MODEL"
    title: "Optical models to be used in the experiment"
    file_mime_type: "application/octet-stream"
    doc_mime_type: "application/pdf"
    doc_file: "tutorial_optical_model.pdf"
  - document_ref: "DOC-0002-THERMAL-MODEL"
    title: "Thermal models to be used in the experiment"
    file_mime_type: "application/octet-stream"
    doc_mime_type: "application/pdf"
    doc_file: "tutorial_thermal_model.pdf"
  - document_ref: "DOC-0003-OBS-STRATEGY"
    title: "Format and measure units of the sky scanning parameters"
    file_mime_type: "application/octet-stream"
    doc_mime_type: "application/pdf"
    doc_file: "tutorial_obs_strategy.pdf"
  - document_ref: "DOC-0004-CAL-CURVES"
    title: "Calibration curves for the amplifiers"
    file_mime_type: "application/octet-stream"
    doc_mime_type: "application/pdf"
    doc_file: "tutorial_cal_curves.pdf"
  - document_ref: "DOC-0005-AMPLIFIER-SPECS"
    title: "FOO-BAR amplifier datasheet"
    file_mime_type: "application/octet-stream"
    doc_mime_type: "application/pdf"
    doc_file: "tutorial_ampl_datasheet.pdf"
  - document_ref: "DOC-0006-BANDSHAPE"
    title: "Format of bandshapes"
    file_mime_type: "application/octet-stream"
    doc_mime_type: "application/pdf"
    doc_file: "tutorial_bandshapes.pdf"
Save this into a file named tutorial.yaml.
(Note: JSON is much faster to load than YAML, and it should be preferred. We are using YAML here because it looks cleaner to read. InstrumentDB transparently supports both JSON and YAML.)
Organization of entities and quantities
In our example, we might think of the following structure for our entities:
Telescope
Optical model (quantity)
Thermal model (quantity)
Sky observation strategy (quantity)
Acquisition chain
Detector A
Amplifier
Calibration curve (quantity)
Data sheet (quantity)
Bandshape response (quantity)
Detector B
Amplifier
Calibration curve (quantity)
Data sheet (quantity)
Bandshape response (quantity)
The safest way to define the structure of entities is through a YAML file. InstrumentDB has the ability to read a YAML/JSON file and populate the database with its contents. Users have still the possibility to manually create each entity and quantity using the web interface, but for deeply-nested structures like the one above, it is better to go through a text file.
Append the following text at the bottom of file tutorial.yaml:
entities:
 - name: "telescope"
   quantities:
     - name: "optical_model"
       format_spec: "DOC-0001-OPTICAL-MODEL"
     - name: "thermal_model"
       format_spec: "DOC-0002-THERMAL-MODEL"
     - name: "sky_observation_strategy"
       format_spec: "DOC-0003-OBS-STRATEGY"
 - name: "acquisition_chain"
   children:
     - name: "detector_A"
       children:
         - name: "amplifier"
           quantities:
           - name: "calibration_curve"
             format_spec: "DOC-0004-CAL-CURVES"
           - name: "data_sheet"
             format_spec: "DOC-0005-AMPLIFIER-SPECS"
       quantities:
         - name: "bandshape"
           format_spec: "DOC-0006-BANDSHAPE"
     - name: "detector_B"
       children:
         - name: "amplifier"
           quantities:
           - name: "calibration_curve"
             format_spec: "DOC-0004-CAL-CURVES"
           - name: "data_sheet"
             format_spec: "DOC-0005-AMPLIFIER-SPECS"
       quantities:
         - name: "bandshape"
           format_spec: "DOC-0006-BANDSHAPE"
Now, you have to tell InstrumentDB to create these entities and
quantities in the database. Since the YAML file points to a number of
files containing the specification documents (e.g.,
tutorial_bandshapes.pdf), it is better to use the version of
tutorial.yaml that is contained in the examples
directory. Run the following command:
poetry run manage.py import examples/tutorial.yaml
Warning
Be sure not to run this command if you have already populated the database, as it will mess up your structure. Better to install another copy of InstrumentDB in a temporary directory and use that.
If everything goes well, the structure of entities and quantities will be loaded from the YAML file and used to provide a structure to the database.
Run the webserver with the following command:
poetry run manage.py runserver
and go to page http://127.0.0.1:8000/.
Upload data files
There are two ways to upload data to the database:
Use the «Admin» interface;
Use the RESTful API.
The «Admin» interface can be accessed at http://127.0.0.1:8000/admin/ using a web browser, and it requires authentication. The RESTful API is much more powerful, and it is perfect if you want to inject many objects in the database.
Using the RESTful API from the command line
The RESTful API uses HTTP commands to create/modify/retrieve objects in the
database, and it can be used either from the command line (using tools like
curl or httpie) or programmatically. We’ll show
how to use httpie first.
First of all, we need to call login service in order to get the authentication token, required by all the REST services.
To log in , install httpie and run the following command:
http POST http://127.0.0.1:8000/api/login  \
      username=user1 password=passwd54321
If the call to login service is successful, you should see the following output with the token and other info:
HTTP/1.1 200 OK
Allow: POST, OPTIONS
Content-Length: 118
Content-Type: application/json
Date: Thu, 18 Feb 2021 14:28:01 GMT
Server: WSGIServer/0.2 CPython/3.7.4
Vary: Accept, Cookie
X-Content-Type-Options: nosniff
X-Frame-Options: DENY

{
    "groups:": [
        "group1"
    ],
    "token": "e0dcc1d3802aab6ee955723eca97aac3d1bff4a2",
    "token_expires_in_minutes": 15,
    "user": "user1"
}
To create a new entity named foo, run the following
command:
http POST http://127.0.0.1:8000/api/entities/   \
  name=foo quantities:="[]" "Authorization: Token e0dcc1d3802aab6ee955723eca97aac3d1bff4a2"
This is the way a RESTful API operates: you post an object to a URL, which
in this case is http://127.0.0.1:8000/api/entities/. The real object must be
described using a JSON record, but httpie has the handy feature to build
JSON records out of key/value pairs specified using the syntax
keyword=value (for textual fields) or keyword:="value" (for JSON
objects, like the empty list [] or the Boolean values true and
false).
If the call to http is successful, you should see the following output:
HTTP/1.1 201 Created
Allow: GET, POST, HEAD, OPTIONS
Content-Length: 106
Content-Type: application/json
Server: WSGIServer/0.2 CPython/3.7.6
Vary: Accept
X-Content-Type-Options: nosniff
X-Frame-Options: DENY

{
    "children": [],
    "name": "foo",
    "parent": null,
    "quantities": [],
    "uuid": "cb49c625-bd96-4027-99fd-91c3b8ff8a6b"
}
Obviously, the field uuid will be different in your case. To create a
children, you have to specify the UUID of the parent:
http POST http://127.0.0.1:8000/api/entities/ \
    name:="bar" \
    parent:="/api/entities/cb49c625-bd96-4027-99fd-91c3b8ff8a6b/" \
    quantities:="[]" \
    "Authorization: Token e0dcc1d3802aab6ee955723eca97aac3d1bff4a2"
(Change the value of the parent key to use the UUID printed before, and
be sure to remember the end slash!)
Uploading stuff using Python
The same commands used in the previous paragraphs can be used in programs, of course: it is enough for your programming environment to have a HTTP library.
Let’s see how to create objects in the database using Python. In this example we create the same object structure as the one above:
import requests as req

server_url = "http://127.0.0.1:8000"

# Get authentication token (login)
# For security reasons, you should store both username
# and password in a separate text file and read it before
# calling the following "req.post()" statement. We'll
# keep things simple here
response = req.post(url=f"{server_url}/api/login",
    data={"username":"user1", "password": "passwd54321"}
)

# Ensure that the request was completed
assert response.ok

# Get the token
authentication = response.json()
token = authentication["token"]

# This dictionary must be passed as header to all the requests
auth_header = {"Authorization": f"Token {token}"}

# Create a new entity in the database
# Note that if you forget the `headers=auth_header` part,
# this command will halt with a HTTP 401 error (unauthorized
# request)
response = req.post(
    url=f"{server_url}/api/entities/",
    data={ "name": "foo_python", "parent": None },
    headers=auth_header,
)

# Ensure that the request was completed
assert response.ok

uuid = response.json()["uuid"]
print("Object created, UUID is ", uuid)

# Create another entity in the database,
# which is a child of the one above
response = req.post(
    url=f"{server_url}/api/entities/",
    data={
        "name": "bar_python",
        "parent": f"{server_url}/api/entities/{uuid}/",
    },
    headers=auth_header,
)

assert response.ok
Accessing the database
Accessing the objects in the database can be done using the web interface at http://127.0.0.1:8000/. However, there are other ways to do this, and they are the same we explored above when we uploaded objects in the database: the «Admin» interface and the RESTful API. Here we concentrate on the latter.
To have a glimpse of all the objects of some kind in a database, you can
use tools like curl or httpie to read from the following URLS:
(Tip: you can open these URLS using a web browser, and a nice textual (representation of the records will be rendered on the screen.)
To access a specific object, just append the UUID and a trailing slash (don’t forget this!):
curl http://127.0.0.1:8000/api/entities/cb49c625-bd96-4027-99fd-91c3b8ff8a6b/
Of course, the same URLs can be used in programs, like the Python script
that imported requests in the above paragraphs. The possibilities are
endless!